Showing posts with label frugal. Show all posts

Sunday, June 22, 2014

Thyme for Ham, Mushrooms, and Macaroni & Cheese.

Every home cook constantly concocts various add-in combinations for boxed macaroni and cheese.  The options are endless, thankfully, because when it’s after 5 pm and dinner plans are nonexistent you need a shortcut.

Today’s rain ended with a beautiful sunset and a chill in the air, perfect for comfort food.  Included in “comfort food” is wine, of course.  A bottle of simple Pinot Noir sat unopened and lonely in my cupboard so I decided to invite Annie and her Shells and WhiteCheddar boxed macaroni and cheese.  To make it a party I also gathered maitake mushrooms, cooked ham, swiss cheese, and fresh thyme; all are very friendly with Pinot Noir.


Mushrooms in Japan are delicious and very affordable; I always have a variety on hand.  I selected the maitake this evening, instead of the shiitake I also have, because they only had a few usable days left.  The ham is leftover from a six-pound, bone-in pork butt I baked recently specifically for the leftovers which are so incredibly delicious and versatile.  The swiss cheese is self-explanatory, I always have sliced cheese, if I ever don’t I might as well be dead.  Thyme is one of my very favorite herbs and I am so happy that my little plant is producing a fantastic harvest of tiny thyme leaves!  Every time I step out on to my front porch and snip some sprigs off I want to run joyously up and down the sidewalk proclaiming my love for fresh thyme. 

I could stop here because if you can make boxed macaroni and cheese you can probably figure out the rest but I will add my “recipe” and cooking method because this is my blog and I choose to.


Thyme for Ham, Mushrooms, and Macaroni & Cheese

1 box of white cheddar macaroni and cheese
1 cup mushrooms, chopped
1 cup cooked ham, chopped or cubed
2 slices of swiss cheese, torn into smaller pieces
1 tsp. fresh thyme leaves (give or take to taste)
1-2 tbsp. butter
1 tbsp. half-and-half (or milk)

1. Begin to boil water for the macaroni noodles; while the water heats and the noodles cook you will prepare the rest of the ingredients.
2. Melt butter in a skillet on medium heat; add mushrooms and sauté until soft, 5 minutes or so.  Remove mushrooms and all the buttery liquid into a small bowl, set aside.
3. Lower heat for skillet as low as it will go, add the ham and cover the pan.  The ham is already cooked and just needs to be warmed but must retain its moisture.
4. Drain the noodles when they are cooked.  While they are draining pour the reserved buttery mushroom liquid into the warm sauce pan (on low heat) and swirl it around; then add the cooked noodles and stir them so they are covered in the butter. 
5. Add the powdered cheese packet; stir.  Pour about 1 tbsp. of half-and-half into the packet, swish it around to capture the hidden cheese powder and add it to the pot; stir until the powder is dissolved.
6. Add the swiss cheese pieces; stir.  Add the ham; stir.  Add the mushrooms; stir.  Add the thyme; stir.  When all the ingredients look combined it is done.


Don’t forget about the Pinot Noir.  Hopefully you opened the bottle while you were cooking and tasted the various ingredients alone and in combination with each other between sips, paying attention to how the flavors played with each other.  Really, that is the best practice of learning how to match and complement wine with food.  And it’s fun.


P.S.  Remember to check the damaged food section of your grocery store, that is where I found this macaroni and cheese for 79¢ a box.  There was a tiny bend with no perforation or tear and a sell-by date far in the future.  Score!

Thursday, May 1, 2014

DIY: Hanging Produce Baskets.

No matter how much kitchen counter space you have it is never enough.  You begin with beautiful, clean, flat surfaces and before you know it you are shuffling and shoving objects around for more work space.  This is how our kitchen began:


And this is what it looks like now, for real.  I just walked in and took this photo without touching anything.  It's on the cleaner side but I can guarantee that whenever you see a photo of mine taken in the kitchen I have most certainly moved things around for a less cluttered frame.  Notice how you do not see the top of the cupboards.


I have wanted hanging produce baskets for a while now and keep my eyes open for them at second hand stores.  Yes, I know they are not expensive, Amazon sells them for about $10.  But I love projects, especially ones that are easy and save a little money, and my do-it-yourself hanging basket is exactly that.

Daiso is a large Japanese chain of ¥100 stores (they even have a few along the west coast of the United States) that I have mentioned in previous posts.  It's equivalent to the Dollar Tree stores but with a much better selection in my opinion.  I bought the 4 items needed for this project there, hence costing approximately $4.25 and an hour of my ample spare time.


I purchased three wire mesh baskets and a chain designed to hang a flower pot, the latter of which I already have but it's in storage somewhere in Texas.  To keep the integrity of the chain I used links from a jack chain to form small hooks to attach the baskets, thus making them easily adjustable as well.  I found them in my miscellaneous hardware boxes that I proudly love and care for meticulously; I've had them, and some of the contents, for over ten years.


With a pair of needle-nose pliers I attached three hooks around the outer rim of each wire basket approximately equal distance apart but didn't bend them closed in case adjustments were needed.  I began with the smallest basket, looping the hooks through the chain as high as I could while still being able to put my hand in to retrieve an item, which ended up between links 6 and 7.  Then I found the middle of the remaining chain length and looped the second basket at that location, between links 14 and 15.  The last and largest basket was then hooked on the last links, obviously.

However, when I lifted the entire unit it was a bit uneven, for two reasons I discovered.  First, there was one less link on one of the three hanging chains, 20 instead of 21.  To solve this I simply added an extra link from the jack chain I was re-purposing.  Secondly, my spacing of the three hooks around the baskets' perimeters was a bit skewed.  Since they had not been tightened closed it was easy to re-position them and level the baskets.  Once I was satisfied with the positioning I tightened the hooks.  Done.


To hang it from the ceiling I drilled a hole, screwed in an eye hook, and used some extra chain and a clip to hook it up (all from my hardware stash).  This makes it fully adjustable if I change its location around our current house and where ever we move in the future.


Here are some detail photos of how I hooked the baskets on.  Some of the "S" hooks are scratched up a little but they sort of nest in the other links and I don't notice it much.


The photo above shows the extra link I attached to make up for the chain that was one link short.  In all I am very happy with the results and imagine that similar baskets would make corners useful in multiple areas like the office or bathroom.  

While typing this out I had company with me, making sure I stay near and remember his dinner.


Tuesday, April 8, 2014

Thrifty Cleaning Tip: Savings on Spray.

Before I even share this nugget of creative frugality I feel the need to first justify my use of the product.

My use of disposable cleansing wipes started slowly because I find them expensive and environmentally unsound.  When my siblings began having children I began to understand the obvious hygienic diapering needs of parents and caregivers and loosened my rules to accept bathroom wipes.  Then I discovered that window cleaning wipes left far less lint and foggy residue than a spray with towels (whether cloth or paper) and began using those, especially on photo frame glass.  Now I live in a house with white tile floors and white, rubbery caulking sealing every imaginable edge that shows every little fuzz, hair, or who-knows-what that touches it.  Add to that a cat who throws up and leaves trails of little kitty paw prints through the house and you get a woman who uses cleaning wipes.

The selection of cleansing wipes is minuscule here, we can choose between Clorox and Lysol brands.  I choose the type of Clorox wipe that cleans up grease also, making it perfect for the entire house because, as I forgot to mention, our kitchen has ultra-white counter tops and all white appliances.  When we moved in I bought a two-pack to keep under the kitchen sink containing a total of 150 wet wipes.  I noticed a fair amount of liquid left in the bottom once the first container was empty so I dumped it into the second container; it seemed wrong to discard it.

A couple weeks ago that second tub of wipes was running low and there was a considerable amount of liquid left.  I tried pouring some on paper towels but it didn't seem to have adequate cleansing ability and I concluded that a spray bottle was my best solution.  Today I stopped by a decent ¥100 store and bought one then filled it up with excess liquid and now I have over 300 ml of perfectly good cleaning spray.

What a Thrifty Cleaning Tip!  Pour excess cleaning solution remaining in a disposable wet wipe container into a spray bottle to reuse.  For safety, please label the spray bottle with the contents, especially the chemical components.  Simply cut the paper label and tape it to the spray bottle.


Please, be safe and label and bottle.

Monday, December 30, 2013

Supply Drawer Dividers.

You may have just finished reading about my lovely Supply Drawer Reface project.  If yes, thank you and please continue reading to see where the story leads.  If you have not, may I suggest following this link to do so in order to catch up.


After refacing.


When filling up all my newly refaced drawers I took care to maintain a comfortable level of organization that would enhance function yet not force rigid guidelines on precisely where items must be put back.  Let’s face it, sometimes we just dump things in drawers.  Even you.

The two deep bottom drawers mainly store bulky and less used items like stationary, old label makers and extra boxes of safety pins, tape, and the like.  They stay fairly organized on their own and are comfortably sitting this round out.

The three shallow drawers on top are used constantly because they hold the writing instruments, scissors, tape, rulers, sticky notes, and etcetera.  Now that the supply drawers live in a shared space (i.e. not my own separate office) my husband uses it almost as often as I do and I must learn how to share it needs to function for both of us.  

Most used of all five drawers is the top one.  I wish I took a “before” photo but surely you can picture a 10x12 inch drawer filled with a mixture of pens, pencils, markers, and miscellaneous writing utensils.  The thing is, it’s always been that way; any attempted organization eventually failed, reverting it back to a single dumping drawer.  Though not ideal, it worked.  But when I began dumping them in this time, after fixing it up, I stopped and said, “No, there must be a better way.”

Those who know me are aware of my obsession making and using organizers out of old boxes.  (I’m actually in the middle of yet another said project).  Sometimes I fear this may lean towards the hoarding spectrum.  At any time you can visit and see a couple small groupings of small and medium-sized empty boxes, but at the same time you can also see where and how I've used them in practical manners.  Here is one of those stories…


Stay hydrated. 


I began with a large, clean work surface; the empty drawer, freshly cleaned and refurbished; and all the needed supplies for the project.  The boxes I used came with a popular Scotch and are made of a great cardboard that is quite sturdy for its relative thinness with a smooth, white interior.


Length.

Depth.

Using a ruler that is exactly 12 inches (30.48cm) end-to-end I measured the length of the drawer.  The ruler actually fit at exactly that length at the shortest part so if I made the drawer dividers 30cm long they would fit at any point across the drawer comfortably.  The drawer height is 8.5 cm so I decided on 7cm for the divider height so it would be deep enough to hold a lot but not tall enough to impede opening the drawer (obviously).

Please be very careful using your cutting instrument of choice.

The original box is 33.5cm x 9-9.5cm (the sides have small size discrepancies common for mass-produced consumer product boxes) so I needed to trim it down.  Using the side with the longest end as the bottom of the divider (in this case, the side with the lid flap) I measured 7cm up from there on both sides.  I cut the small lid flaps off because they are not needed and just get in the way.  Then using a very sharp box cutter I very carefully cut along the 7cm marked line all the way around.  The excess just cut off is not needed in this project, I put it into recycling.


Snipping the bottom edge to make the flaps.

Now the divider is taking shape.  I measured 30cm along the bottom, marking a line there indicating where I wanted the end of the divider.  I then cut along the corners up to that line creating small flaps and folded them to the inside.  Holding them there I mustered all the dexterity I could and pulled the box up on its end in order to fold the bottom (roughly shown in the photo).  I marked a new line on the end where the side flaps came up and cut that extra part off.  At this point I pulled out the tape and started holding and taping everything together until I had the finished organizers that fit perfectly in the drawer.


A confusing photo for a confusing step.


When I started sorting the markers and pens into their new dividers I didn't like how items looked or felt in the middle space.  I worried that smaller objects may slide under the boxes and decided to make another, smaller box, to put in the middle.  Of course.


Oh, she's at it again.

Often when my husband finishes a box of cereal he will thoughtfully leave the empty box at the bottom of the pantry, next to the paper recycling, in case I want to use it.  So when I opened the pantry door that afternoon an empty box awaited me.  Destiny, it was, when I tested the size of the box and it fit absolutely perfect in that empty space.  I was so excited; it took me only a couple minutes to measure, cut, and tape the box for the middle as well as a slightly smaller one to put inside.  I was giddy at this point and couldn't wait to begin filling them.

Markers, pencils and miscellaneous, and pens.

The resulting drawer organizers are exactly what I wanted.  If the outside designs on the boxes bother me I can easily trim them down more or cover them with white paper to unify the look.  I’ll wait and see.

Top drawer.

To satisfy your curiosity, the second drawer holds scissors, rulers, tapes, and few other things.  In the center is a clear divider cut from a large Q-Tip box.

Second drawer.

The third drawer utilizes some plastic dividers I found at a thrift store many years ago and contain various things that don’t categorize well.

Third drawer.

Sharing this project seems a bit personal, as if you are pilfering through my drawers and fingering my eclectic mixture of pens (which all work well, by the way).  At least you know who you can always borrow a pen from though.


Supply Drawer Reface.

Last October I completed setup of my office space which occupies half our formal dining room (that is never used for formal dining) as shown in that story.  Though I considered my office essentially done I knew a few minor projects remained; Isn't that always the case though?

“Shoved in the right corner (under the heating/cooling unit) are my old, busted up, plastic Rubbermaid storage drawers for my office supplies.”  They sat in that same condition until recently.  I pretty much knew how I wanted to fix them up but did not yet have a clear plan.  My first thought was Con-Tac paper, but the biggest name in self-adhesive paper also seemed to be the biggest priced and online prices didn't differ much from the local selection.  At that point the project moved to the back-burner until a better solution arose.


Before: Rough shape.

Before.


After: Wow, how did this happen?

After.


A couple weeks ago my husband and I went to a Japanese home store called Super Viva Home that carries almost everything you would use at home and then some.  While wandering around curtains and carpeting I noticed a section with self-adhesive paper and instinctively looked directly at a small stash of bits and pieces rolled up individually and priced very, very low.  I selected a small roll of white paper with a subtle wood grain-like texture for ¥39!  That’s about 39₵ if you remember that 1 yen is about 1 penny, give or take a fraction with currency fluctuation.  That tiny purchase instigated my supply drawer refurbishment.


First things always first: Clean!  I emptied the drawers and carefully wiped them completely out.  This included the laborious chore of using Goo-Gone to remove tape residue from packers who practically mummified the unit with packing tape.  After that I had to use isopropyl alcohol to remove that residue.   For certain cleaning tasks lately I've been using grease-cutting disinfectant wipes.  I know, I know, not the most environmentally sound but one wipe will outlast several paper towels and the cloth-like texture seems to clean surfaces better and dries quickly.  (I work very hard making conscious decisions regarding the environment but no one is 100% earth-friendly, we just try to do our part best we can.)  The grease cleaning capability of the wipes also helped prepare the plastic for the adhesive paper to stick thoroughly after the extensive Goo-Gone treatment.


With the hard part over the fun can commence: Time to “measure twice and cut once” as my handyman-skilled Grandpa Jack always said.  He passed that to my crafty Mom and she passed it to me.  Using a flexible measuring tape I followed the width of the curved drawer façade with a little overhang on each side, 31.5cm.  Why not 32cm?  I like the challenge.  Then I measured the height from the bottom up to the drawer pull indentation with a straight ruler, 5.5cm for the shallow drawers and 9.5cm for the deep drawers.  Before cutting the paper for each drawer I double checked the measurements.


Notice the tiny square design on the front, I'll use that later.


The adhesive paper is from a German company, d-c-fix, so the grid on the back used metric measurements making cutting (after re-checking my numbers) a breeze. 


I did not use the paper trimmer to cut, it would gum up the blade.  I set it on top to prevent the paper from rolling up.

Using my acute attention to detail I found a method to adhere the paper as centered as humanly possible.  I cut a small strip from the middle of the measured and cut piece and lined it up with a small, square design element on the front center of every drawer.  After lightly placing the sticky portion on the center I leveled the paper near the bottom of the drawer, leaving a small space to prevent accidental unpeeling over time.  When it looked straight and even I firmly pressed the middle to secure it.


Stuck on the middle square.


Taking a deep breath I entered the point of no return: the final peel-and-stick.  This is not a strength of mine, evidenced by the countless screen protectors I have ruined over the years by poor application attempts on multiple electronic devices.  The odds here leaned slightly in my favor though as the adhesive paper is flexible and doesn't easily slip from your fingers and slap down on the surface.  Using a small, stiff ruler (yes, I have many rulers) and beginning from the center cut I made previously I slowly peeled back the paper while using the ruler’s edge to lay it flat.  I repeated this process for each drawer and ne'er an air bubble in sight.


As I mentioned previously, this drawer unit is old, well used, and injured after a few long-distance moves.  Some of the drawers have damage, some repaired, some not.  I still had adhesive paper left so I measured and cut pieces to cover both sides of the damaged spots, hopefully adding some reinforcement as well.  Since these areas are on the sides I was not overly concerned about perfect aesthetics but simply made sure they were covered and protected adequately.


This fix is years old and still holding.

New damage.  I stuck paper on both sides, staying a bit from the edge to prevent peeling.


Finally the time came to re-fill the drawers.  This process was fairly simple because before we moved I carefully went through them, removing items unnecessary to bring with us and discarding those not worthy of storage.  This time, however, I realized that one drawer in particular needed organization so I left that one empty to begin my next endeavor, Supply Drawer Dividers.  Stay tuned.


Finished drawer.  Notice the slight over hang on the side an the tiny space left at the bottom.

Close up of wood-grain embossing.


Sunday, December 22, 2013

Gift Box Trick.

Genius.

Absolutely, creatively genius.

I have been volunteering at a fundraising gift wrap table recently and this incredible trick was shared by a customer to another volunteer who then passed it to me.  Since then I have shared it with every other volunteer and numerous customers because of its sheer simplicity and practicality.

This is how to get twice as many gift boxes out of your current supply and/or create new sizes from what you already have.

Step one: Get a box top or bottom.


Step two: Fold one end to up to the opposite flap edge.


Step three: Fold the other side to the opposite flap edge.


Step four: Using scissors cut the creases to the box edge.


Step five: It's ready to use.  Just open it up.  To close, tuck the small, square flaps that you cut to the inside of the box.  It's really easier done than said.


This trick works great with gift boxes that get partially crunched or scarred with a tape rip.  If you do not already reuse gift boxes then I really hope you at least recycle them.  If not, shame on you please reconsider.  It takes minimal effort to reduce your consumption, reuse what you already have, and recycle what you can.  Honestly, my main reason for using these guidelines is financial because economically it just makes sense.  It just so happens that these practices are also smart for the environment.  Win-win.


(These photos were taken with an iPhone and are by no means intended to be "real" photos, just snapshots of where I was and what I saw.)


Sunday, November 17, 2013

DIY: Elastic Cuff Links.

Over the years I've discovered that my arms are slightly longer than the average person for my body type.  That or I like my sleeves to fit longer than average for my size.  Two sides of the same coin, I guess.  Nonetheless, when I find a jacket that fits well in the torso the sleeves are too short, and conversely, when the sleeves are correct the body is too loose.

One way to circumvent this is to wear 3/4 length sleeves either by design or, more often, by rolling them up a bit.  I have a few denim jackets that I love with too-short sleeves but folding the cuffs is a problem.  Folding the cuffs up while buttoned makes them too tight on my forearm and cuffing while unbuttoned leaves them loose and falling open.

At first I safety-pinned the ends but found that the pins would pop open, bend, or damage the fabric.  I needed something like a stretchy cuff link and after trying a few types of elastic and rubber bands with various methods I finally found a suitable solution, a hair elastic.  I have a handful of these pony tail holders (the term we used growing-up) from when I had longer hair and now use them all over the house for all sorts of purposes.  They are a fantastic little creation.

Last week when I grabbed my incredibly versatile, white, Levi's denim jacket from the closet I realized the sleeves weren't rolled up and the little elastics I used were not in the buttoned pocket where I like to keep them after washing it.  So I used the opportunity to document the simple process.

First, I cut an average sized hair elastic in two equal pieces and knotted them at the ends creating two loops about an inch long.


Next, I looped it through the button hole and pulled one end through itself.  Apparently this is called a lark's head knot.


Then I pulled that same end and stretched it over the button.  Easy peasy.


Lastly, two folds up of the cuff and it's ready to wear.


I used a brown elastic here because that is what I had laying around.  Someday I'll buy a package of colors or neutral tones but it's not a priority.  The other jackets I've done this with are darker and it's less noticeable, but it's hidden quite well on the back of the forearm.

There you have it, a quick and easy fix for problematic jacket cuff rolls.


2013.11.14.
[Canon EF 50mm f1.4 USM]

Saturday, October 19, 2013

My New Office Space.

Leaving Texas was easy.  Losing my very first, very own office space was difficult.  I finally had an entire room solely for productivity and creativity, though not always in practice simultaneously.  Other than the door that I could close when needed, my absolute favorite quality of that space was the light, I noticed it upon first walking in.  The window faced west so the afternoon sun kept the room bright and the evening setting sun flooded it with soft, golden light.  Enterprise loved the sun-warmed carpet patches and rolled with them throughout the day.  The window framed beautiful sunsets on the horizon but if you dropped your gaze any lower the ant mounds and weeds quickly reminded you of your location.

Our attached house in Japan is about as large as the one we left in Texas but it is older and laid out completely different.  It has two stories, one bathroom, and lots of walls with oddly placed and strangely spaced closets.  The largest difference though is that instead of three bedrooms (a master and two offices) it has two bedrooms and a formal dining room.  This new configuration led to compromise.

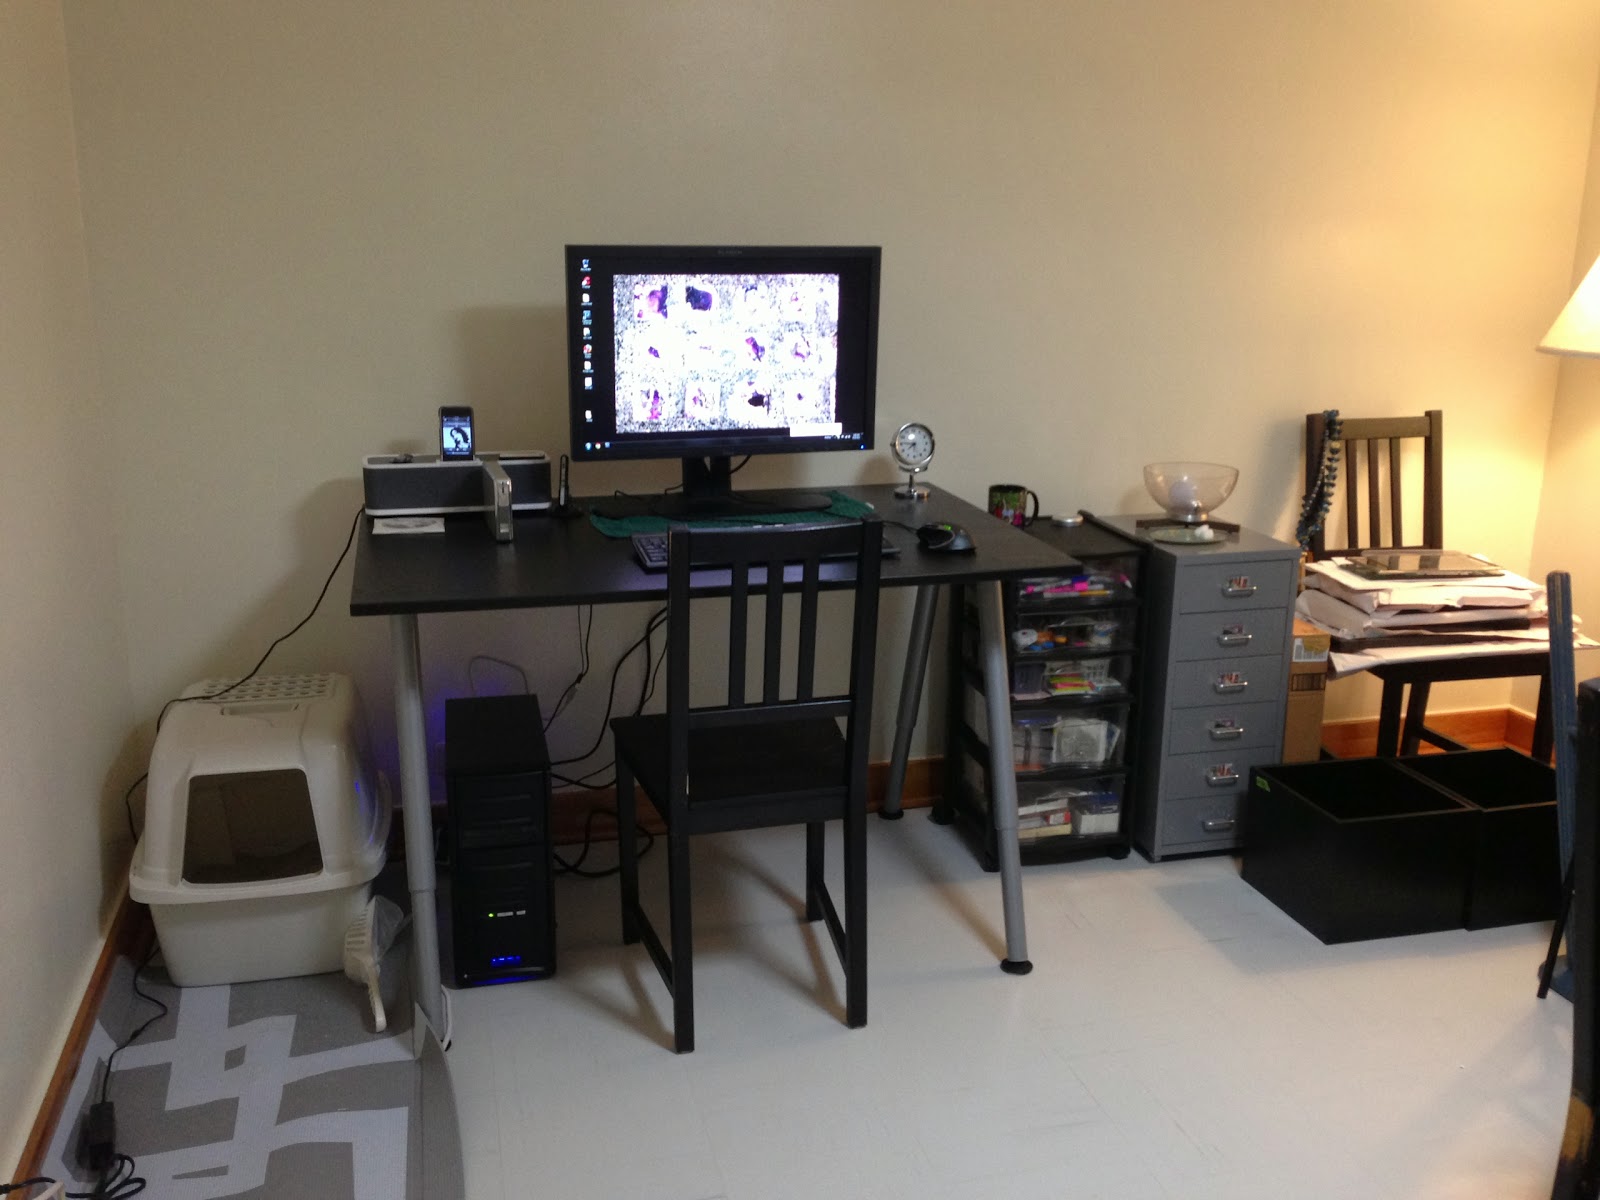
Since we have infrequent need of a dedicated formal dining room my new office shares that space.  Figuring out how to combine the two functionally and aesthetically has been a challenge, including litter box placement, wall outlet locations, and remembering that the heating and cooling unit installed near the ceiling may leak (meaning no computer under it).  I also considered lines of sight from the living room, front door entrance, as well as from outside through the front, double windows.

I’ll show the progression.

First, after assembling my new desk:


Then after the arrival of our household goods:


And the current, mostly final design:


To understand the space, the camera is set up in the back corner, at the kitchen entrance; to the right is the doorway to the living room.  There is an actual door there that I can shut if I want to block out television noise from the living room or contain my noise in my office or kitchen.  It is quite nice.

By choice, we do not have large dining room furniture.  The table you see to the right is from a restaurant booth so it is incredibly durable, cleans up well, and has a simple, central pedestal support.  The surface is a great, medium brown wood grain that fits with most décor, it repositions easily around the room, and also allows for a second work surface.

The desk is from Ikea’s Galant workspace series and, at 80x120 cm, is approximately the same size as the dining table.  The deep top is appropriate for the large monitor I have, the simple legs are fully adjustable, and the series includes many components I can add later.  It is very versatile and can work in many areas of the house if needed, especially because it is in the same black-brown color as most of our Ikea purchases.  Speaking of, the chairs (and chair pads) are also Ikea, the inexpensive Stefan style in the same color, though I see the price has increased since we purchased two in Washington state and two in Texas.  Using one as my desk chair helps unify the room.

The workhorse piece in the room is the tall Billy bookshelves from, you guessed it, Ikea, in the same color; we actually scored these off Craigslist, brand new, in the box, for half of the original selling price.  They were formerly used as my husband’s bookshelves in our last living room and are the only large shelving we brought with us.  Since our living room here has nice built-in shelves I commandeered them for my space.  Offices collect small supplies and clutter and keeping the shelves neat is a priority because of its highly visible location.  So I gathered my beloved kitchen tins to double as storage and decoration – I love it!  The small, brown boxes are inexpensive purchases from Ikea I used in my former office and the minty green boxes were displays at Nitori that I just scored for 479¥/$4.89 for the set.  The messier looking items are on the lower shelves and I still have to figure out a plan for them but for now it’s acceptable.


Secondary storage is still a work in progress.  The silver, metal Helmer drawer storage (from Ikea) holds my miscellaneous photography gear.  Shoved in the right corner (under the heating/cooling unit) are my old, busted up, plastic Rubbermaid storage drawers for my office supplies that sit atop an old, broken, stack-a-shelf drawer for my tools.  The lacquered wood piece is actually a checker board on one side and usually leans in front of them to hide the ugliness.  Since both sets of drawers are usable I am not replacing them but am hoping to somehow refurbish them, I’m thinking spray paint or Contact paper.


Hidden behind the dining table to the right are some plastic file crates, a few small boxes of unframed photos, and the few framed photos I brought are still sitting on the chair on the opposite side of the table.  Unseen to the left in the overview photo are a few black stack-a-shelves that are waiting for a clear purpose.  I also still have a couple unused white stack-a-shelves upstairs but will probably not use them in this room for aesthetic reasons.


The two black and cream rugs were purchased on super-low clearance at Sears about four years ago and only used lightly in Texas in our entry area.  I love them, they add a layer of texture to the area and also helps define the space as separate from the dining area.

The ceiling lamp is fluorescent and gives off a horrible, cool tone light.  Eventually I plan on replacing the bulbs with a set of warm fluorescent bulbs I saw at a local home store but it’s not a priority because I have the two incandescent floor lamps.  The ugly, gold lamp is a loaner but it gives such soft, warm light that it’s staying.  I am looking for something to wind up the pole and cover the gold but have not found anything yet, hopefully soon.

Lastly, I am considering window treatments.  If I put up anything it will be simple, white sheer panels which are my curtains of choice.  My hesitation is that too much light will be blocked.  The windows face north/northwest and what little light comes in is mostly shaded by the plentiful, mature trees in the neighborhood.  Light is everything so I am weighing my options carefully.


Photo three:
2013.10.16.
[Canon EF-S 18-135mm f/3.5-5.6 IS UD]

Photos four through seven:
2013.10.19.
[Canon EF 50mm f1.4 USM]